Saturday, August 8, 2015

Sauteed Ginger Green Bean Recipe

Green beans are one of those vegetables that we grow, but they never make it to the canning or freezing stage in our house.  If my husband had his way, he would just boil the snot out of them and eat them that way.  It is a gross comparison, but that is about how I feel eating them that way.  So I have found a few other ways to cook them to make them more appetizing.  It must work, because the pounds and pounds of green beans that we grow never make it past the dinner table.

One of the easiest things to do is to make "Green Bean Fries."  Clean the beans, snap off the ends, and put them on a cookie sheet lightly coated with olive oil.  Bake at 400 degrees until they are all nice and crispy (the time it takes will depend on the size of your beans).  They won't taste like french fries, but they will be tasty and have a nice satisfying crunch.  These are a favorite of both myself and my daughter. She likes the crunchiness.  I like the easy preparation, and being able to leave them in the oven to cook while I prepare the rest of dinner.  You can add some salt if that is your thing.

Another recipe that I frequently use is Ginger Green Beans.  It doesn't seem to matter how much I make of this recipe, there are never any leftovers, even when I want there to be!


Ginger Green Beans:

Ingredients:

  • 2 TBSP olive oil
  • 2 tsp minced ginger
  • 1 lb green beans (washed, with ends snapped)
  • 2-3 TBSP soy sauce (we used reduced sodium)
  • Sesame seeds as desired
Directions:
  • Heat oil in the skillet over medium-high heat and saute green beans until they begin to lightly brown.
  • Add ginger and sesame seeds.
  • When all ingredients start to brown, turn heat down to medium-low.  Add soy sauce and stir until just cooked.
  • Serve.

Friday, July 24, 2015

Garden Harvest Begins

The rain has finally let up a bit.  Our zucchini, tomatoes, squash, potatoes, green beans and other veggies have been keeping us busy and well-fed.  The raspberries have also been coming in well.  My daughter and I made a very good raspberry-zucchini bread.  I tried a new recipe, courtesy of Fern Creek Farm.  The bread was delicious.  Sadly there are no pictures, because any loaves that didn't make to the freezer were eaten within 3 days.  They sure were tasty.
Zucchini and raspberries.

One of our zucchini plants.

A zucchini peeping out from among the leaves.

Our acorn squash have been taking over.  They have busted out of their fence and are moving into the goat pen.  Luckily for us, the goats don't find the plants tasty.
The acorn squash that have demolished the bunny fence.
Acorn squash, moving into the goat pen.
Chad has also been having some trouble with his tomato plants.  One in particular refuses to be contained, busting out of every kind of tie-up.  It has almost turned into a shrub it is so large.  I have put a picture of Chad next to the plant for some perspective.
Chad and his tomato shrub.

Saturday, July 11, 2015

Mason Dixon Fair 2015

We survived another fair, although the weather was once again uncooperative.  This year we had lots and lots of rain, which led to some serious flooding in our animal pens, as well as super muddy conditions around the fairgrounds.  We had to move all our animals to one pen at one point because the other pen was so full of water.  They weren't particularly keen on that, but settled in better once there was lots of hay for everyone.

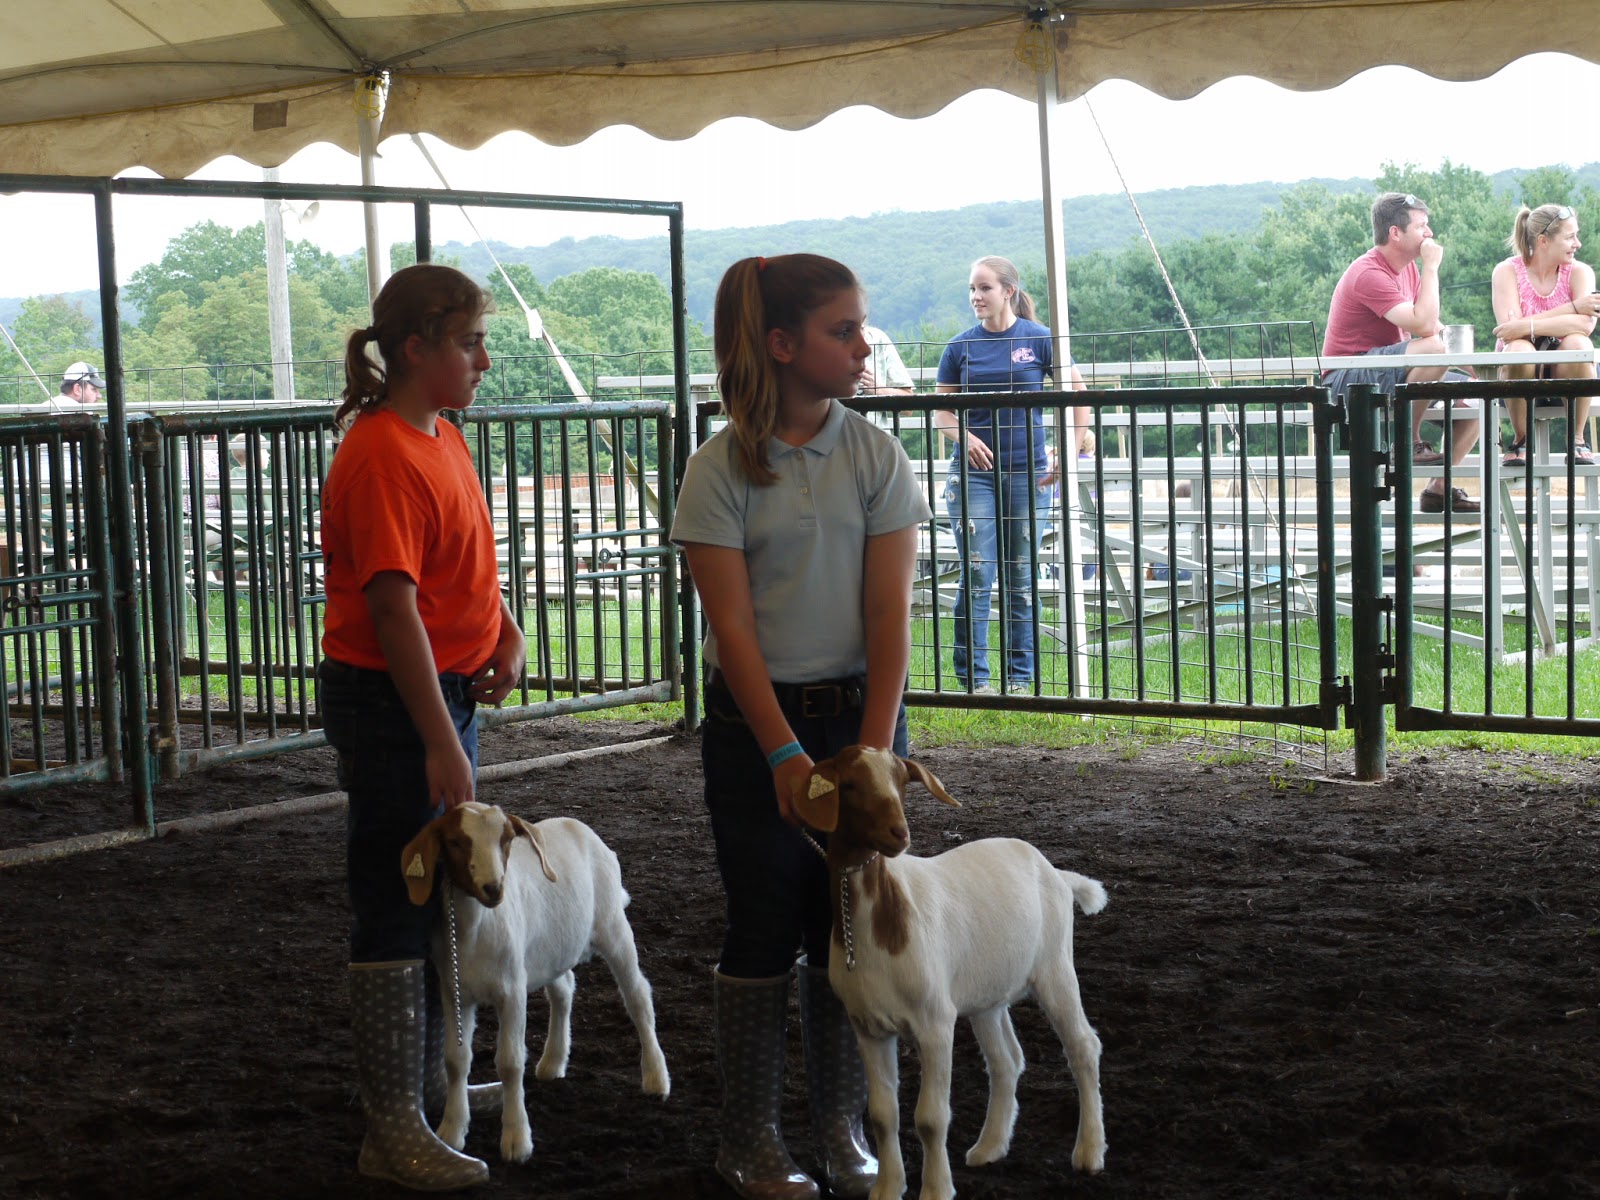
Monday was the breeding goat show.  Colleen's friend Alli came to help her show this year.  They both did well.  There was a hilarious moment, which I unfortunately did not capture on camera.  As the goats and handlers were lined up for the judge, Colleen and Alli were placed next to each other.  Copine, who was being showed by Alli, apparently felt that Colleen was giving too much attention to Butterscotch (her sister), and jumped up to put her front feet on Colleen's back in the middle of the show ring.
Alli (in blue) is showing Copine.  Colleen (in orange) is showing Butterscotch.

Butterscotch is not cooperating for Colleen.
The girls and goats are both paying attention to the judge.

The girls, goats, and their ribbons.
Butterscotch and Copine snuggling after their showing is finished.
Tuesday Colleen showed the angora goats; Alli again came to help.  This time the goats were pretty well behaved (Sassafrass sat down in the middle of the ring at one point, but it was really hot out).  However, while the show was going on, a pig escaped and was running around outside the ring.  Overall, the goats were relatively chill about it.
That pig in the background is NOT supposed to be there. Sassafrass is not too pleased about it and is trying to get away from it.
Colleen with Sassafrass; Alli with Nikki.

Alli with Nikki.


Colleen and Leah.


Sassafrass claiming the water bucket.

A few other interesting moments:

The cow barn was located behind our tent.  At one point, I turned around to see a cow helping herself to one of the water spigots.  I thought someone had left it on, and was commenting on it with someone.  One of the cow 4Hers walked by and told me that the cow had learned to turn the water on whenever she wanted a drink and help herself.  I did not realize cows could be that smart.  Here's a photo of the cow getting a drink:

Wednesday, the last night we were there, they held the tractor pulls; at least until the thunderstorms of mud and doom rolled in.  Colleen loves tractor pulls for some reason, so she and Chad went to watch them.  They tried to continue them once the rain started, and all the fans ran to the barns and tents to watch.  After awhile the mud got too bad and they had to stop.  Also, they eventually used some of the tractors to help pull cars and trucks out of the mud when they got stuck as people were trying to leave.
Chad and Colleen enjoying the tractor pulls while staying dry.

Saturday, June 20, 2015

Visit to Ladew Gardens

So it's been awhile. We're still here! Things have been busy. I purchased a used drum carder, and my daughter and I have been playing with that.  It's been fun blending fibers, colors, and (my favorite part) adding sparkly stuff! I confess, I love fiber with bling. Now I just need to get my spinning wheel tuned up so I can spin some of this stuff up. Did I mention how soft it is?

Moving on.... Last weekend we made a trip with my mom to Ladew Gardens.  It's only half an hour from our place, so I'm not sure why we haven't been before. I drive by all the time.  But we waited until an absolutely hot, humid, really sticky summer day to go. Because that's Maryland weather peeps.  And if you're going to see a really cool topiary garden that is mainly an outdoor attraction, that is when you want to go.  Well, actually, the site says that June is one of the best times to see the gardens in bloom (they neglect to mention anything about Maryland weather in June, but those of us who work outside in Maryland know how it is).  It was still really awesome, and I think the hot weather kept some people from going, so it wasn't terribly crowded.  We went on a tour of the house too.  The man was a traveler.  He bought an old farm plantation with a house and fixed it up to be more like an English manor, going to auction houses and other places internationally to bring back items to furnish his house (some of them rather large, like entire walls made of Tudor wood paneling).  He also knew lots of rich and famous people, some of whom came to visit.  His library is interesting too, with over 3,000 books. What is more intriguing to me is that it was designed mostly around one piece of furniture.  He brought back an oval writing desk from one of his travels, and didn't have anywhere in his house that it "fit." So he built a library to fit the desk (complete with a hidden door behind one of the bookshelves). And that is just the house.

There were a number of different gardens, each with their own theme. I have put some pictures below:
Mom and Colleen walking through the terrace gardens.

A view of the house and terrace gardens from a distance.


Colleen having fun in the Victorian garden. There were fountains in most of the gardens.

Some of the arches in the rose garden.

I took lots of pictures of these rose arches so my husband can make me some. (Right sweetie?)

One of Colleen's favorite parts: trying to catch the frogs.
The "wading pool" and a view of the house.

A nice refreshment on a hot day.

Topiary swan.

I thought this arch was neat, as it was completely made with trees (no metal that I could see).  It looked like something from Middle Earth.

Colleen on the other side of the archway.

Possibly our favorite topiary: the unicorn.


Wednesday, March 25, 2015

Goat Kids

Okay, so it's been a rough year so far, what with me being injured and all.  I have already had a trip to the urgent care center and the ER, and that all happened before spring even got here.  In January, I managed to slip on the ice getting out of my truck and sprain just about everything in my ankle and foot.  If you are going to do something, you might as well do a thorough job.  So that is still recovering (but no more crutches!  Although no one really expects you to do barn chores in crutches.  It does, however, mean that you can't really go out and play with the baby goats either).  And then there was the migraine that sent me to the ER a few weeks ago.  That took a little while to recover from.

So I have finally managed to get some pictures of the goat kids that were born at the end of January/early February.  Unfortunately we did not have any angora kids.  One of our angoras miscarried triplets early in the season, and another had a stillborn kid. We are sad about that.  But we do have a boeragora kid (Boer/Angora cross).  Missy, one of our Boer crosses, decided to get busy with Basil, the Angora buck.  My husband was not happy about the resulting kid, even if she is totally adorable.  He would report back to me daily on the progress of the goat kids, and jokingly tell me that there was a "llama" baby in the barn (the mixed goat kid).  So somehow she got stuck with the name "Princess Llama."
"Princess Lllama," our Boeragora.
We also have three other goat kids, also doelings:
Butterscotch, Copine, and Sierra.
One set of twins and a single.  Since there were three of them, we each got to name one.  You can tell they all have the same dad!

Here's my girl, Butterscotch, giving me a weird look:

My husband's goat, Sierra, has a peculiar habit of jumping on top of any adult goat willing to let her.  And then standing there for as long as she can.  Usually her mother is the only goat willing to put up with this (I will spare you the pictures of her falling off all the other goats, as those aren't as funny to look at as it is to watch).
This photo is not staged. And apparently none of the goats are impressed.

And finally, Colleen hanging out with Princess Llama:

Wednesday, December 31, 2014

Tutorial: DIY Dog Training Pads

And the Toby saga continues....

So, after The Chocolate Incident, Toby began sucking down water like a camel, except for the retaining-it-in-a-hump-for-later part.  Yay! More carpet steam-cleaning! My floors are so clean right now! This is not why I took vacation time. However.

After a few hours at the vet the day after Christmas, Toby was diagnosed with diabetes.  Not sure if that was the chicken or the egg with regards to The Chocolate Incident, but now he is receiving insulin shots twice a day (not too bad, except that he is very furry).  Unfortunately he is a on a strict 12-hour feeding/shot schedule (which doesn't seem too bad in theory, but the practice of it is a little more difficult) and we are still working on the proper dosage.  Which means he is still peeing everywhere.  And since this apparently what I am going to be spending my vacation days on, I decided to upcycle some of the zillions of the empty grain bags sitting in our barn and make some of my own doggy training pads for him. 

The Tutorial is below.  There is one for a large pad and one for a smaller pad.

You will need:
  • Absorbent fabric (fleece, old towels, flannel).  I used 2 layers per pad, but you can use as few or many as you want.
  • Empty grain bags (you can rinse them out and let them dry beforehand).  This will be used for the bottom, water-proof layer, so a waterproof fabric may be used for a substitute.
  • A sewing machine
  • Thread
  • Scissors
  • A measuring device

Instructions (large pad):
Large-sized dog training pad.
  • Measure the length and width of the grain bag (leave it folded in half to provide extra protection).  The ones I used measured 19"x 36".
  • Cut the fabric layers to measure 19"x36" if you are using fleece (I highly recommend this as you do not need to worry about finishing the edges of fleece).  If you are using another fabric, you can serge-over the edge or add 1" around each of the edges and sew under prior to putting on top of the grain bag.
The flannel has been cut to 19"x36".

The edges of the flannel have been stitched.
  • Layer your fabrics, like a sandwich, and pin in place.  Because fleece is stretchy, you can usually overlap a little over the edge and fold in place.
The underside of the training pad, with the fleece pinned in place and ready for stitching.
  • Sew around the outside edges. I used a zig-zag stitch.
  • Sew a line down the center of the shortest side (in this case, at the 18" line).  Sew two additional lines at 9" and 27".  This will help hold the fabric in place.
The training pad has been stitched down in thirds, to help hold the fabric in place.

Instructions (small pad):
Small-sized dog training pad with a 2-inch plastic border.

  • Measure the length and width of the grain bag (leave it folded in half to provide extra protection).  The ones I used measured 19"x 36".
  • Cut the fabric layers to measure 15"x32" if you are using fleece (I highly recommend this as you do not need to worry about finishing the edges of fleece).  If you are using another fabric, you can serge-over the edge or add 1" around each of the edges and sew under prior to putting on top of the grain bag.  This size will allow a 2" plastic border for the edge at the end.
  • Once you have your fabrics cut and the edges finished as needed, layer them and center them on the pad.  Pin in place for stitching.
  • Stitch down the center (at 18") and the two "thirds" (approximately 8" off each side from the center) to hold the layers in place.  You may also stitch around the edges prior to folding the plastic edges up if so desired.
  • Fold up the plastic edges.  Pin and sew in place.

Washing recommendations: Soak in cold/lukewarm water with detergent prior to washing.  Wash on a delicate cycle in cold/water water.  Line dry, DO NOT put in dryer.


Sunday, December 21, 2014

Trying not to take small things for granted

This has been a crazy week.  It's cold and flu season.  I despise cold and flu season.  Mostly because I have to use many public restrooms during the course of my daily work, and the number of people who also use these restrooms, and then walk out without washing their hands, is appalling.  My unofficial estimate is easily 30-50% of people.  Gross.  And we wonder why we all get so sick.

Also I have a child.  Children pass germs around like they are bffs.  And then they bring them home, sneeze on your shared computer, or offer to wash the dishes (who wants to say "no" to that?) and BAM, you have a cold.  But then there are also nice people in the world.  People who notice that you are sick, and try to make your life just a little easier.  Who say,"Why don't you sit in the warm truck while we finish up out here? If you need something, come out and let us know."  People who are ok with just going somewhere where you can get soup for lunch and not making a big deal out of it.  Husbands who don't mind picking up ginger ale on the way home from work, again, because I drank it all and really don't feel like stopping myself.  These are the things that make me happy.

And then Friday happened.  Let me preface it by saying that I cannot take Sudafed or other cold medicine during the workday, because it makes me really sleepy. So, after working all week, I was really, really looking forward to coming home, taking some cold meds, and crashing hard.  Unfortunately, when I walked into my house, I was greeted to a scene from the Walking Dead.

Toby, the older corgi, has been put on Senior dog food this year.  The vitamins and glucosamine chondroitin really give him lots more pep.  It also gives him the energy to get into lots more trouble.  On Friday he decided to get into lots of trouble.  He pushed a 6-8 lb toolbox out from in front of a cabinet door (it was there specifically to keep the animals out, since the cabinet latch no longer works), and helped himself to some baking supplies.  Specifically, a large number of chocolate chips.

I think it was fortunate that most of it came back up (fortunate for Toby, not for the carpets).  However, as I had been at work all day, it had already been several hours since he had eaten the chocolate, and I had no idea how much he had eaten.  Suffice it to say, it was a rough weekend for both of us.  Today was the first day Toby is back on solid food.  He gets oatmeal and boiled egg mixed with chicken broth - which he is not too impressed with.  He ate it, but only after giving me a look.  If he is feeling well enough to be that upset about his food, I will take it.  I never thought I would be so happy to have one of my dogs give me the stink eye.